I would be grateful for a professional translation or correction of the following text. Please E-Mail to Delta Lima 2 Yankie Echo Oscar @ Queen Romeo Papa 4 Uniform .Delta Echo
Thermal Power Meter
Safety instructions
Attention fire risk: The following circuit turns electrical energy into heat. Note that the resistors Ra and Rb are sufficiently dimensioned concerning the power dissipation and no inflammable material is located close to them .
After one has built a QRP transmitter, it would be interesting to know the exact amount of output power. Without a power meter the peak to peak voltage Vss is measured at an 50 ohm resistance (dummy load) with the available oscilloscope. Now the power rate can be calculated according to the formula P = V x V / R. For V the effective voltage rate Vrms = 0,707 x Vss / 2 is to be used.
With this type of power determination by a voltage measurement there are different sources of error: A dummy load resistance deviating from 50 Ohms when heating up, the basic accuracy of the oscilloscope, the amplitude drop of the Y amplifier at high frequencies and a possibly not correctly calibrated 10:1 probe. Each more or less measured volt has an appropriate influence on the result of the calculation (power) due to V x V. 50 % deviation upward or down from the real power level is quite possible under worst case conditions.
Thermal Conversion
Another method of the power determination gets along without measurement of the HF voltage. It operates according to the principle of the thermal conversion. A controller ensures that the temperature at the two heating resistors Ra and Rb is identical. Rb is warmed up as long as the bridge circuit consisting of the temperature sensors Fa/b and the resistors R1/2 is ballanced. The DC power dissipated by Rb corresponds then exactly the HF power dissipated by Ra. As controller an operational amplifier with a linear amplifier (power transistor) is usually used. Rb receives thereby as correcting variable a variable voltage. Since the amount of heat is however proportional to the square of this voltage, one gets a controller loop gain proportional to V x V. The result is a nonlinear step response and thus all well-known problems concerning the controller stability at setpoint changes. The additional power dissipation at the linear amplifier of max. 0.5 x Pmax is here only mentioned by the way.
Switching Regulator
The disadvantages mentioned before do not apply to the following circuit. The special of the circuit is the use of a switching regulator in place of a continuous controller. The switching regulator TL494 converts the error signal Xd into a proportional pulse duration tp. The output voltage is now constant and it is omitted thereby the disturbing square component in the control loop. The amount of heat is adjusted exclusively over the pulse duration proportionally rising with Ys = f (Xd). The switching losses in the two switching transistors in IC1 are negligibly small.
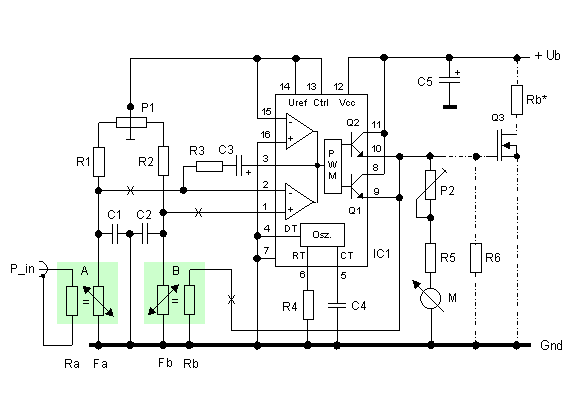
Fig.1: Diagram of the thermal power meter
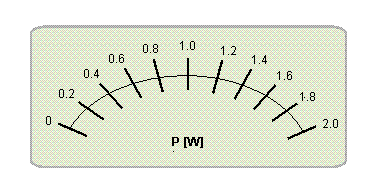
A duty cycle of tp = 0,95 x T is feasible with the parallel arrangement of the switching transistors. The missing 5% are of principle due to the push-pull design of the switching regulator. The operational amplifier in the TL494, configured as PI controller, provides for an optimal regulation quality and transient behavior at setpoint changes. The display of the measured power is very simple; a milliammeter integrates the impulses. The scaling is linear due to the removal of the square component (P ~ tp ~ Ys).
Fig 2: Meter scale with linear marking
Construction Requirements
The constructional aspect of this circuit is for the function likewise from
great importance. Same resistance values Ra = Rb and R1 =
R2, temperature sensors with same characteristic and a strictly symmetrically
arrangement are the prerequisite for high measuring accuracy. Not the absolute
component data but as much as identical data are essential. The load
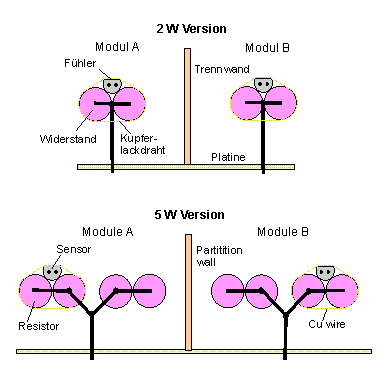
resistances (2 x 100 ohms parallel, 2 W each) and the temperature sensor form a
thermally closely coupled unit (module A and B). The sensor is situated in the
center on top of the two resistors arranged next to each other. It is fastened
with enameled copper wire to the resistors. Something heat-sink compound
improves the thermal coupling.
The modules A and B assembled in accordance with sketch are to be located in
the measuring instrument housing in such a way that they do not warm up
mutually and have same environmental conditions (temperature, air flow.). A
distance from 5... 10 cm between the modules, a partition wall and louvers in
the roof sheet metal are the appropriate constructional measures.
Fig. 3: Modules A and B
Alignment and Calibration at Ub = 13,8 V const.
The quality of the bridge has to be checked first at room
temperature. All the points in the circuit diagram indicated by (X) have to
interrupted for this purpose. Both sensors are separated from the op-amp inputs
and the heating resistors are without any voltage. Now supply Ra and Rb on
after another with 5 V, 7.07 V and 10 V. The temperature increases, whereby the
voltage between the bridge arms should remain in a range of 0 ... +/- 10 mV. At
larger deviations, it is to be assumed that the temperature sensors have too
different characteristics. Other copies of the same type are to be used and
checked in this case. One can adjust a small offset, with same upward gradient
of the characteristics, with P1. If the bridge operates correctly, the second
step follows.
Now connect the op-amp inputs with the bridge arms and Rb to IC1. The power
input P_in gets a constant voltage of 10 volts, which corresponds to 2 Watt.
Adjust P2 so that the meter movement pointer stops at the scale end (100
% = 2 W). Reaching the new setpoint takes some seconds due to the
controllers PI behavior and the process lag. For checking the linearity reduce
the voltage down to 7,07 V. The pointer should then go back to the 50 %
position (1 W).
Note: After calibration at Ub = 13,8 V this voltage rate has to be kept for all following measurements. A value different to this voltage causes a considerable measuring error. The module temperature should not exceed 100 °C. The maximum rating for the temperature sensors itself is specified at 150 °C.
Measuring Range Extension
Who needs a 5 W power meter should take into consideration that Ra/Rb have sufficient high power dissipation rating and the transistors in the regulator IC are not overloaded. If the 13.8 V supply voltage should be kept, it is recommended to reduce the Rb resistance value down to 25 Ohms at the same form factor as Ra*. The current flow through Rb* is then approx. 0,5 A. Any 50 V NMOS power FET (Q3) can conduct this current. The modules are built in such a way, that the sensors see only half the power (max. 2,5 W). The module temperature should not exceed 100 °C. The maximum rating for the temperature sensors is specified at 150 °C.
| Part | Value |
|---|---|
| Fa, Fb | KTY10-6 , KTY81-210 e.g. R25 C° = 2000 Ohm, 1 % |
| Ra,Rb | 50 Ohm, 4 W 2 x 100 Ohm, 2 W each, 1 % Metall or carbon type |
| R1,2 | 2,7 kOhm, 1% |
| R3 | 22 kOhm |
| R4 | 10 kOhm |
| R5 | 33 kOhm |
| P1 | 100 Ohm, lin. |
| P2 | 50 kOhm, lin. |
| C1,2 | 4,7 nF |
| C3 | 1000 uF electrolytic cap., 10 V |
| C4 | 22 nF |
| C5 | 1000 uF electrolytic cap., 25 V |
| IC1 | TL494CN, KA7500, IRMO2 etc. |
| M | 100 uA meter |
| Q3 | 50 V NMOS power FET, BUZ21, IRFZ44 |
| R6 | 1 kOhm |
| Ra* | 50 Ohm, 4 x 2 W 2x (180 Ohm parallel to 220 Ohm) |
| Rb* |